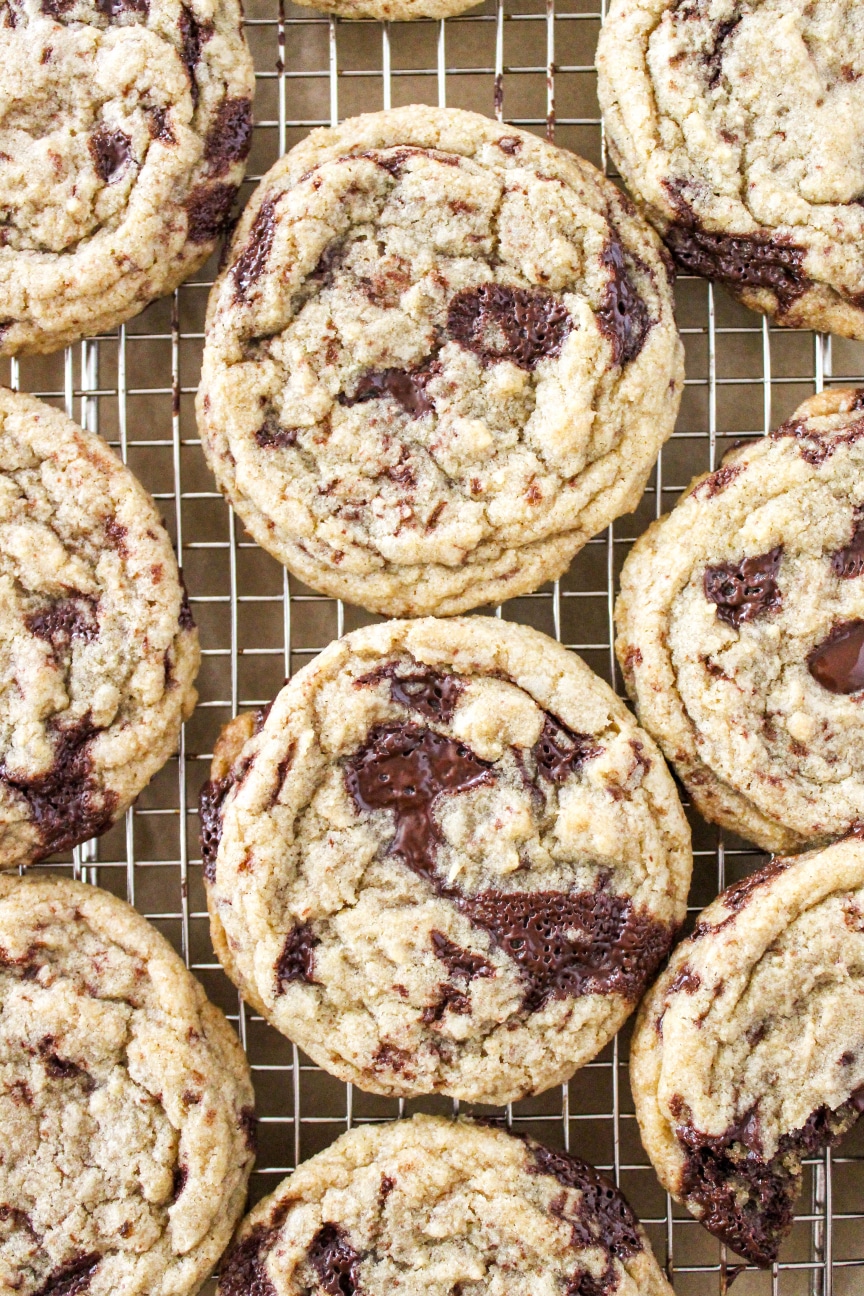
It feels like I never stop working on chocolate chip cookie recipes, and I know for me it’s the forever craving. Today I’m sharing a recipe for a fairly small batch of Salty Chocolate Chippers, and if you’re into salty baked goods, this one is for you!
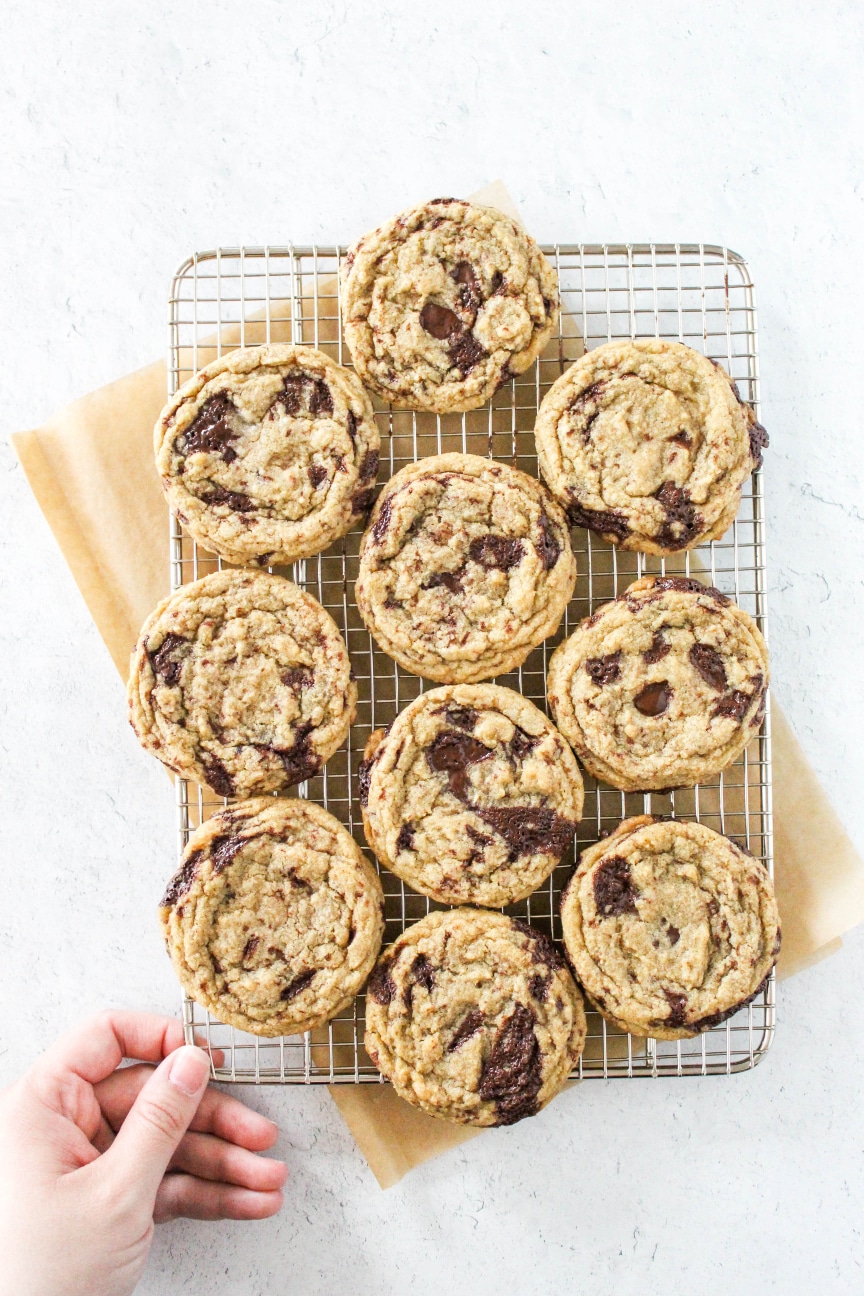
These cookies come out with about 14-16 cookies. They are packed with dark chocolate chunks, browned butter, and of course salt. And one thing I want to warn you of right now is that these cookies take some chill time before baking- it’s worth it! Let’s get to it!
How to Make Salty Chocolate Chip Cookies
We’re starting with the browned butter here. I know this seems like an extra step, but browned butter does a couple of things for this recipe. First, it makes it easiest to mix the whole thing by hand. Plus, it really brings out the flavors of everything in these cookies, including the salt!

I like to let the butter cool for at least 10 minutes, and up to about 20. You want it to still be mostly liquid, but pretty cooled down. Everything else in this recipe comes together like a classic cookie, so we’re adding in the sugars, then the egg and vanilla extract, and finally the dry ingredients and chocolate.
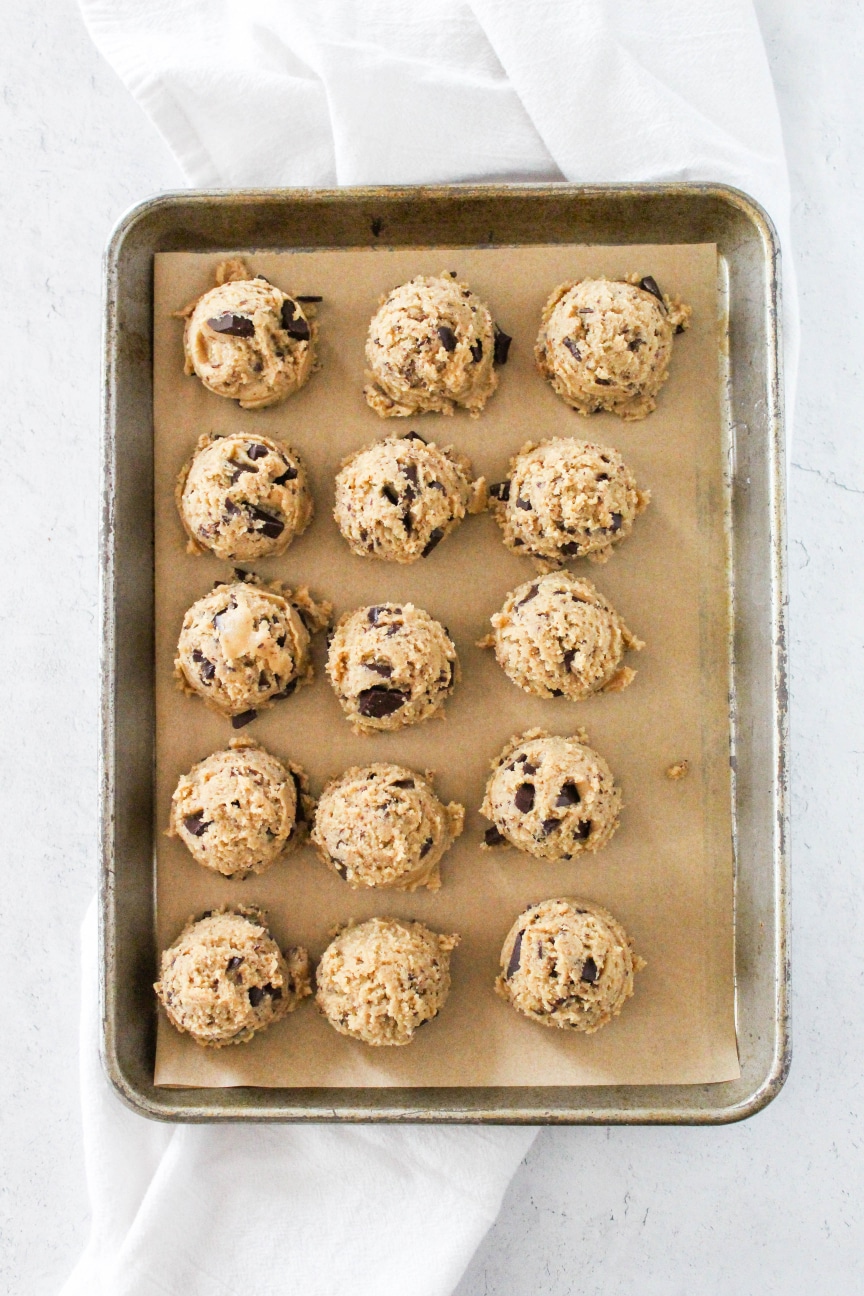
I’m going for a chopped up bar of dark chocolate, which I highly recommend for any chocolate chip cookie recipe. It gives you nice varied sizes of chocolate running throughout, plus you get to choose a bar of chocolate that you really love. The first way you can customize these cookies is to go with any chocolate you like here- it doesn’t have to be dark!

Now it’s time to scoop out the cookies into about 2-tablespoonfuls onto a small lined tray or plate. Cover them and pop them into the fridge for anywhere from 2-24 hours. The longer you chill them, the yummier they will get! When you’re ready to bake, I like mine to be lightly golden around the edges, and looking set in the centers. Enjoy them warm!
Tips & Tricks for Chocolate Chip Cookies
This is a pretty straight forward recipe, but it’s got a few extra steps. Here are my tips and tricks to make them wonderful!
- Brown the butter even though it’s an extra step. It really makes these cookies extremely flavorful and it brings out the salt!
- Don’t skip chilling the dough. While this is mainly a flavor enhancer, you also need the butter to chill back down and firm up before baking these cookies or they will spread too much!
- Use a bar of chocolate but use any kind you like! I love milk chocolate too, and this would be a great place for it to balance out the saltiness a little more!
- Control your salt to be what you like! I like a pretty salty cookie, topped with just a light sprinkle of flakey salt. If you like it really salty, add a more generous pinch of salt on top, and if you like it a little less salty, reduce the salt on the inside of the cookie by 1/4 tsp!
- Bake them as you want them! After the initial chill in the fridge, you can transfer the cookie dough to a plastic bag and pop them in the freezer if you don’t want them right away. They will still bake up wonderfully from frozen!
- I’m at about 5,000 ft above sea level and I find that most people who live between about 3,000 ft and 7,000 ft do not need to make any adjustments to my recipes!
Hope you guys have a cookie filled week!
Salty Chocolate Chip Cookies
Ingredients
- 1 1/4 cups all-purpose flour
- 1/4 tsp. baking soda
- 1 tsp. salt
- 1/2 cup butter
- 1 tbs. milk
- 1/4 cup granulated sugar
- 1/2 cup packed brown sugar
- 1 tsp. vanilla extract
- 1 egg
- 3 oz chopped chocolate
- 1 tbs Coarse salt to top (optional)
Instructions
-
In a medium bowl, whisk together the flour, baking soda, and salt, and set aside.
-
In a medium saucepan (light-colored interior if you have one), melt the butter over medium-high heat until completely melted and bubbling. Lower the heat to low-medium, and use a heat-proof spatula to stir the butter constantly. It should take about 3-5 minutes to start to brown. Once brown bits start to form on the bottom of the pan, remove it from the heat and transfer the butter into a large glass bowl. Immediately stir in the milk to stop the butter from burning. Allow the butter to cool for 10-15 minutes, or until it's still liquid, but the bowl feels mostly cooled.
-
Stir in the sugar and brown sugar until well combined. Then add in the vanilla extract and egg, and again stir until the mixture is combined and the egg is no longer visibly showing any streaks. Add in the dry ingredients, and mix until you've got a thick dough formed. Then, finally add in the chopped chocolate.
-
On a small baking sheet or plate lined with parchment paper, scoop your cookie dough into about 2-tablespoonful-rounds. You should end up with 14-16 cookies in total. Cover the cookies in plastic wrap, and chill in the fridge for at least 2 hours, and up to 24 hours.
-
After chilling the dough, you can either transfer the dough to a freezer safe container and freeze for 3-4 months before baking, or you can bake them now! Preheat your oven to 350 degrees and line a large baking sheet with parchment paper. Place the cookie dough about 2 inches apart on your baking sheet, and optionally sprinkle the tops with coarse salt. Bake for 12-14 minutes, or until lightly golden around the edges. Cool for 5-10 minutes before eating them warm!

Hello and welcome! My name is Nicole, and Dough-eyed is a food blog for people who want to bake for their family and friends in high-altitude areas. Think of me as a friendly voice there with you in the kitchen, here to give you confidence when you’re baking, and to help you with the struggles of baking at high-altitude. Come back every week for new recipes, tips, and advice on high-altitude baking!


I just mixed this and the batter is liquid. It seems like too much butter. Was it supposed to be 1/4 cup not 1/2? This really doesn’t seem right.
Hi there- I'm sorry that this recipe didn't work out for you! The measurements as listed are correct though- I have tested this recipe many times, and make it often. I'm wondering if there was a mis-measurement somewhere while you were putting it together? 1/2 cup of butter is correct, and there is 1 1/4 cups flour in the recipe.
Something is off in this recipe. Either too much butter and or not enough flour. Big waste of ingredients.
Bummer.
These were amazing! I didn't have any trouble with the ingredients or the amounts of them in the recipe. These are a winner. Making again!
So glad you liked them Michelle!
I made these today (doubling the recipe), and they were absolutely perfect!!!! I live in the Denver area and have had a hard time finding a chocolate chip cookie recipe that I love – they are either deflated but tasty, or a cakey and lacking flavor. The ONLY thing I will do differently sometime is to make giant cookies. I bet they will keep their shape nicely!